
Are you unsure how to enable the developer options of the Android Phone? Are you looking for tips and tricks for developers? Then you've come to the right spot! In this post, we will try to simplify the developer options available to you and explain why and how to use this awesome feature in Android.
How do I set the developer Options setting?
The Developer Options option can be found hidden on Android smartphones. It is designed to be used for Android app developers in the business of creating and testing Android applications.
The many options available in Developer options allow developers to test the performance of their apps and how it performs on the real Android handset (instead of a virtual environment created via software emulators). The ultimate objective that is a part of this menu Developer Options menu is to assist developers in customizing the behaviour of the Phone to aid in analyzing the performance of their developing app and ensure there are no significant bugs before the final version is released.
The Developer options menu offers advanced options that could influence the stability and efficiency of the device, and this option is secret from the typical smartphone user.
(ads1)
We advise you not to allow the developer options you don't fully comprehend. They are not irreversible, but the effects could be detrimental in the short run. If you do not turn off an option enabled and then ignore it for a while, your gadget may perform a task that uses up a lot of battery life or even data. Be careful.
There are a few scenarios where some of the options available in the Developer options could enhance the user experience overall and provide the average user with more control over specific aspects of their Phone. Let's look at what they are. However, we have to learn how to turn off the Developer option feature before we do this.
How do you enable Developer options?
The first step to the developer's paradise is to turn on the feature. Based on your device's Android skin/Android version, the procedure to perform this step may (slightly) differ. Below are the steps for some of the most well-known Android versions and skins.
Also Read: How to Add Sleep timer for all media in iOS
How do you activate the Developer option on the stock Android?
Steps for Stock Android are applicable for Google (Pixel series), Motorola, Nokia, and Sony devices.
- Launch Settings. Open the Settings app.
- Click on the About phone option.
- Click the build Number choice seven times quickly.
- You should get an email stating, " You're now a developer! ".
- If you have the developer options turned in use, you might get a message saying, "No need to register as a developer. You already have one.
- Then, return to your Setting menu once more.
- Scroll down, then press to open the system.
- There are options for developers here.

If you're not sure and decide to turn off these developer settings, go to the scenes, and you'll be able to find a toggle that is simple to turn off or on located in the top right-hand corner.
How do you allow Developer Options on Samsung devices?
- On your Samsung smartphone, open Settings.
- Scroll down to the About Phone for a phone or the About tab on your device.
- Click to reveal Information about the software.
- Click for the build Number choice seven times quickly.
- You might be required your password or PIN to complete the procedure.
- After turning the option on, head into settings and verify that it is enabled. The Developer option is disabled by scrolling to the end of the screen.
How do I allow Developer Options on OnePlus devices?
- On your OnePlus device, open Settings.
- Scroll down, then tap About Phone.
- Click on the Build Number option seven times in rapid succession.
- You'll see an announcement: "You are now a software developer!
- Return to the Settings menu and then tap Systems.
- It is recommended to look at the developer options menu here.
How can I enable Developer options on MIUI (Xiaomior Poco) devices?
- On your smartphone running MIUI, Open the Settings.
- Tap the About the Phone (Usually, it's the initial option from the settings menu).
- Click the option that says MIUI Version seven times until you get the message "You're now a developer.
- Return to Settings.
- Go to Other settings.
- Scroll down until you reach the Developer options.

If your smartphone's brand isn't on the list, be aware that the process to enable developer options does not differ much from the above steps.
Let's now look at some of the possibilities by enabling the developer mode feature on your Phone.
Improve the performance of your Android Phone more efficient with these suggestions
Let us, from the start, make explicit that enabling Developer options isn't suggested for anyone. While making changes to many settings available in the Developer options won't render your Phone useless, however, for many people users, the improved user experience that comes from altering the locations might not be enough to justify the effort to enable it.
These suggestions below can enhance the performance and efficiency of your vehicle in everyday usage:
Enhance the performance of your Phone by limiting background applications
The Limit of Background Process option lets you decide the number of applications within the background. The limit is set to four apps. However, you are able to choose to disable background apps running for any reason if you prefer.
(ads3)
In the absence of background processes, all your apps are shut down when they're no longer in use, which means what you're doing now will be given the full attention of Android and resources. However, this does mean that switching between apps will be more difficult. Therefore, you should consider this feature if you're not really into multi-tasking.

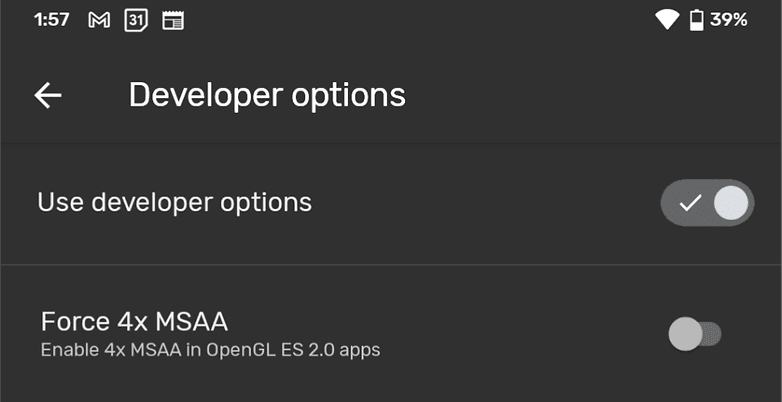
Force MSAA 4x (for better graphics for gaming)
Enabling Force 4x MSAA enhances the visual quality used in games and OpenGL 3.0 and ES 2.0 applications. This is a requirement for higher processing capabilities and consumes the battery quicker. However, if you're happy with that, then say hello to smoother, less jangly graphics. This option is available for devices that run less powerful SoCs.
Change the speed of system animations.
Indeed, this trick doesn't accelerate your device; however, it's a fantastic technique to trick your brain into believing that your device has become more efficient.
Remove all of the device's animations to ensure there's no transition effect during certain actions (such as swiping between the home screen). The result results in a gadget that is faster and more fluid. Try it

.
The frame rate (FPS) at a real-time rate.
If you suspect that the game you are playing isn't running at optimum settings, You can enable the display the refresh rate option to show the current frame rate of graphics on the Phone. This option overlays a refresh rate counter above the screen, showing the current FPS for games, like PC tools such as Fraps and RivaTuner.

If your refresh rate monitor keeps dropping below 60 FPS during games, it could be beneficial to lower the quality settings so that you can play with ease.
Make sure mobile data is always in use (for better internet speed kind of)
It doesn't increase the speed of your mobile data in general. However, it speeds up how mobile data can be used following a Wi-Fi signal loss. This setting could be risky when you don't have a large amount of data available, as it makes your device able to access it faster. Be cautious before you enable it.
For instance, the Wi-Fi signal could be temporarily cut off - just as Wi-Fi signals typically drop - and your Phone will then switch to mobile data even if the Wi-Fi signal comes back rapidly.
If you don't ever exceed your limit on mobile data, set this option, and every time you leave home or go to the office, you'll notice your phone switch to mobile data quicker after you've been out of Wi-Fi.
Check running services
Its option for running the Services option is like Task Manager on the Windows PC. It lets you see which processes are running on your Phone and the amount of RAM being used, and which applications are running on it. The apps listed are arranged by their memory use.
When you click to open an application, you'll see the services and processes it's using. This allows you to shut down applications that consume a lot of RAM, even if you don't use it (don't do this for applications part of the system). We don't advise closing a single application process without shutting down the app by itself, as it may result in crashes and malfunctions.

What else are you able to enable in the Developer options on Android?
If you're interested in seeing what other possibilities you have on your Phone with Developer options, This is the list.
Turn on USB Debugging
The most frequently used option in the Options for Developers is the USB debugging option. Although it was originally designed to allow designers to "debug" their apps, turning on this feature is the most basic requirement to enable root access and install custom software. The ability to allow USB Debugging will also aid in recovering data in situations when your Phone's screen isn't working.
Stay alert (so your display is active while you charge)
I haven't seen any extremely beneficial instances of this feature. If you'd like to keep your display on even when the smartphone is charged, you can use an option to "Stay awake" within the Developer options. This naturally means the battery's life isn't in danger, and if the display needs your constant attention, this option can prove beneficial. If this feature is enabled, it is necessary to press the power button to secure the Phone when charging.
Location mockup
Are you fed up with YouTube videos that aren't accessible in your area? Numerous apps are available on Google Play to disguise your place of residence. Select an app of choice, browse the developer options, and select the Choose mock location app to select the option.
If you tap, it will show the location spoofing app you've just installed. Click on it and then launch the app to select the location you'd like to be transported'. All you have to do following that is to play your content without locking it to a region. It's important to note that this feature may not be available on all smartphones and applications in 2021.
Modify your default USB configuration

Suppose you find yourself constantly connecting your Phone to transfer files or using USB Tethering and are waiting for the message to pop up to alter the purpose. In that case, however, there's another method to make the process less difficult. By changing to the standard USB configuration within the Developer Options, you can get your Android Phone automatically turned on the one you are using the most.
Go to default USB settings and tap it, as illustrated in the image above. There are a variety of choices. The default choice that I have used here is no Data Transfer. That means that when you plug into your phone using a USB, the only thing you have to be doing is charging it. Alongside USB Tethering and Transfer of files, you could select the MIDI HTML1(Musical Instrument Digital Interface) or PTP PTP(Picture Transfer Protocol) to be your standard choice.